Robomaster TT 使用手册
获取 License 授权
请注意
注:本页内容仅支持在 TIANBOT官方售出的空地协同套装中使用,由于渠道问题,在使用rmtt_ros软件驱动服务前,需要联系 Tianbot 官方购买软件服务使用授权License,否则将无法正常使用。
注意
ros2go 中的全部服务中不包含 RMTT 的软件服务使用授权 License
首次收到 Robomaster TT 使用套装后,需要使用tello App对Robomaster TT进行设备检查
检查飞机及传感器和启动飞行是否正常
检查拓展模块是否升级和激活
在手机或平板上安装 tello APP
激活 RMTT
将这个按钮拨到下面,此时开机电脑就能收到 RMTT 的 WIFI 信号,
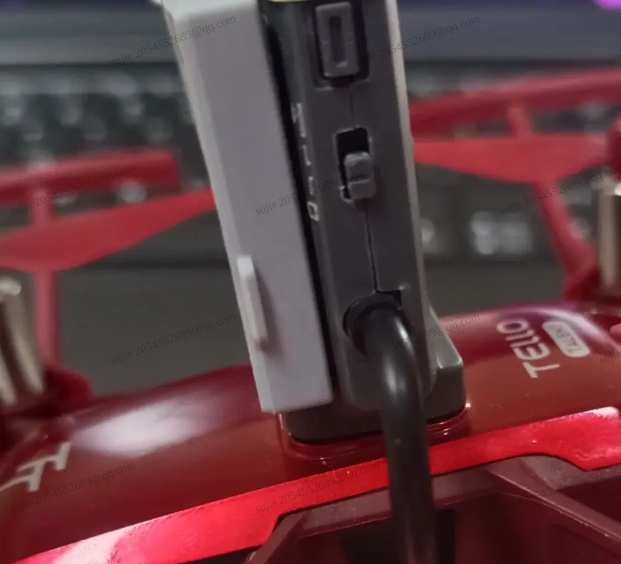
将手机连接到以 RMTT-XX 开头的 WiFi 热点上,打开 Tello 软件
如果看到提示需要 激活 RMTT,则点击激活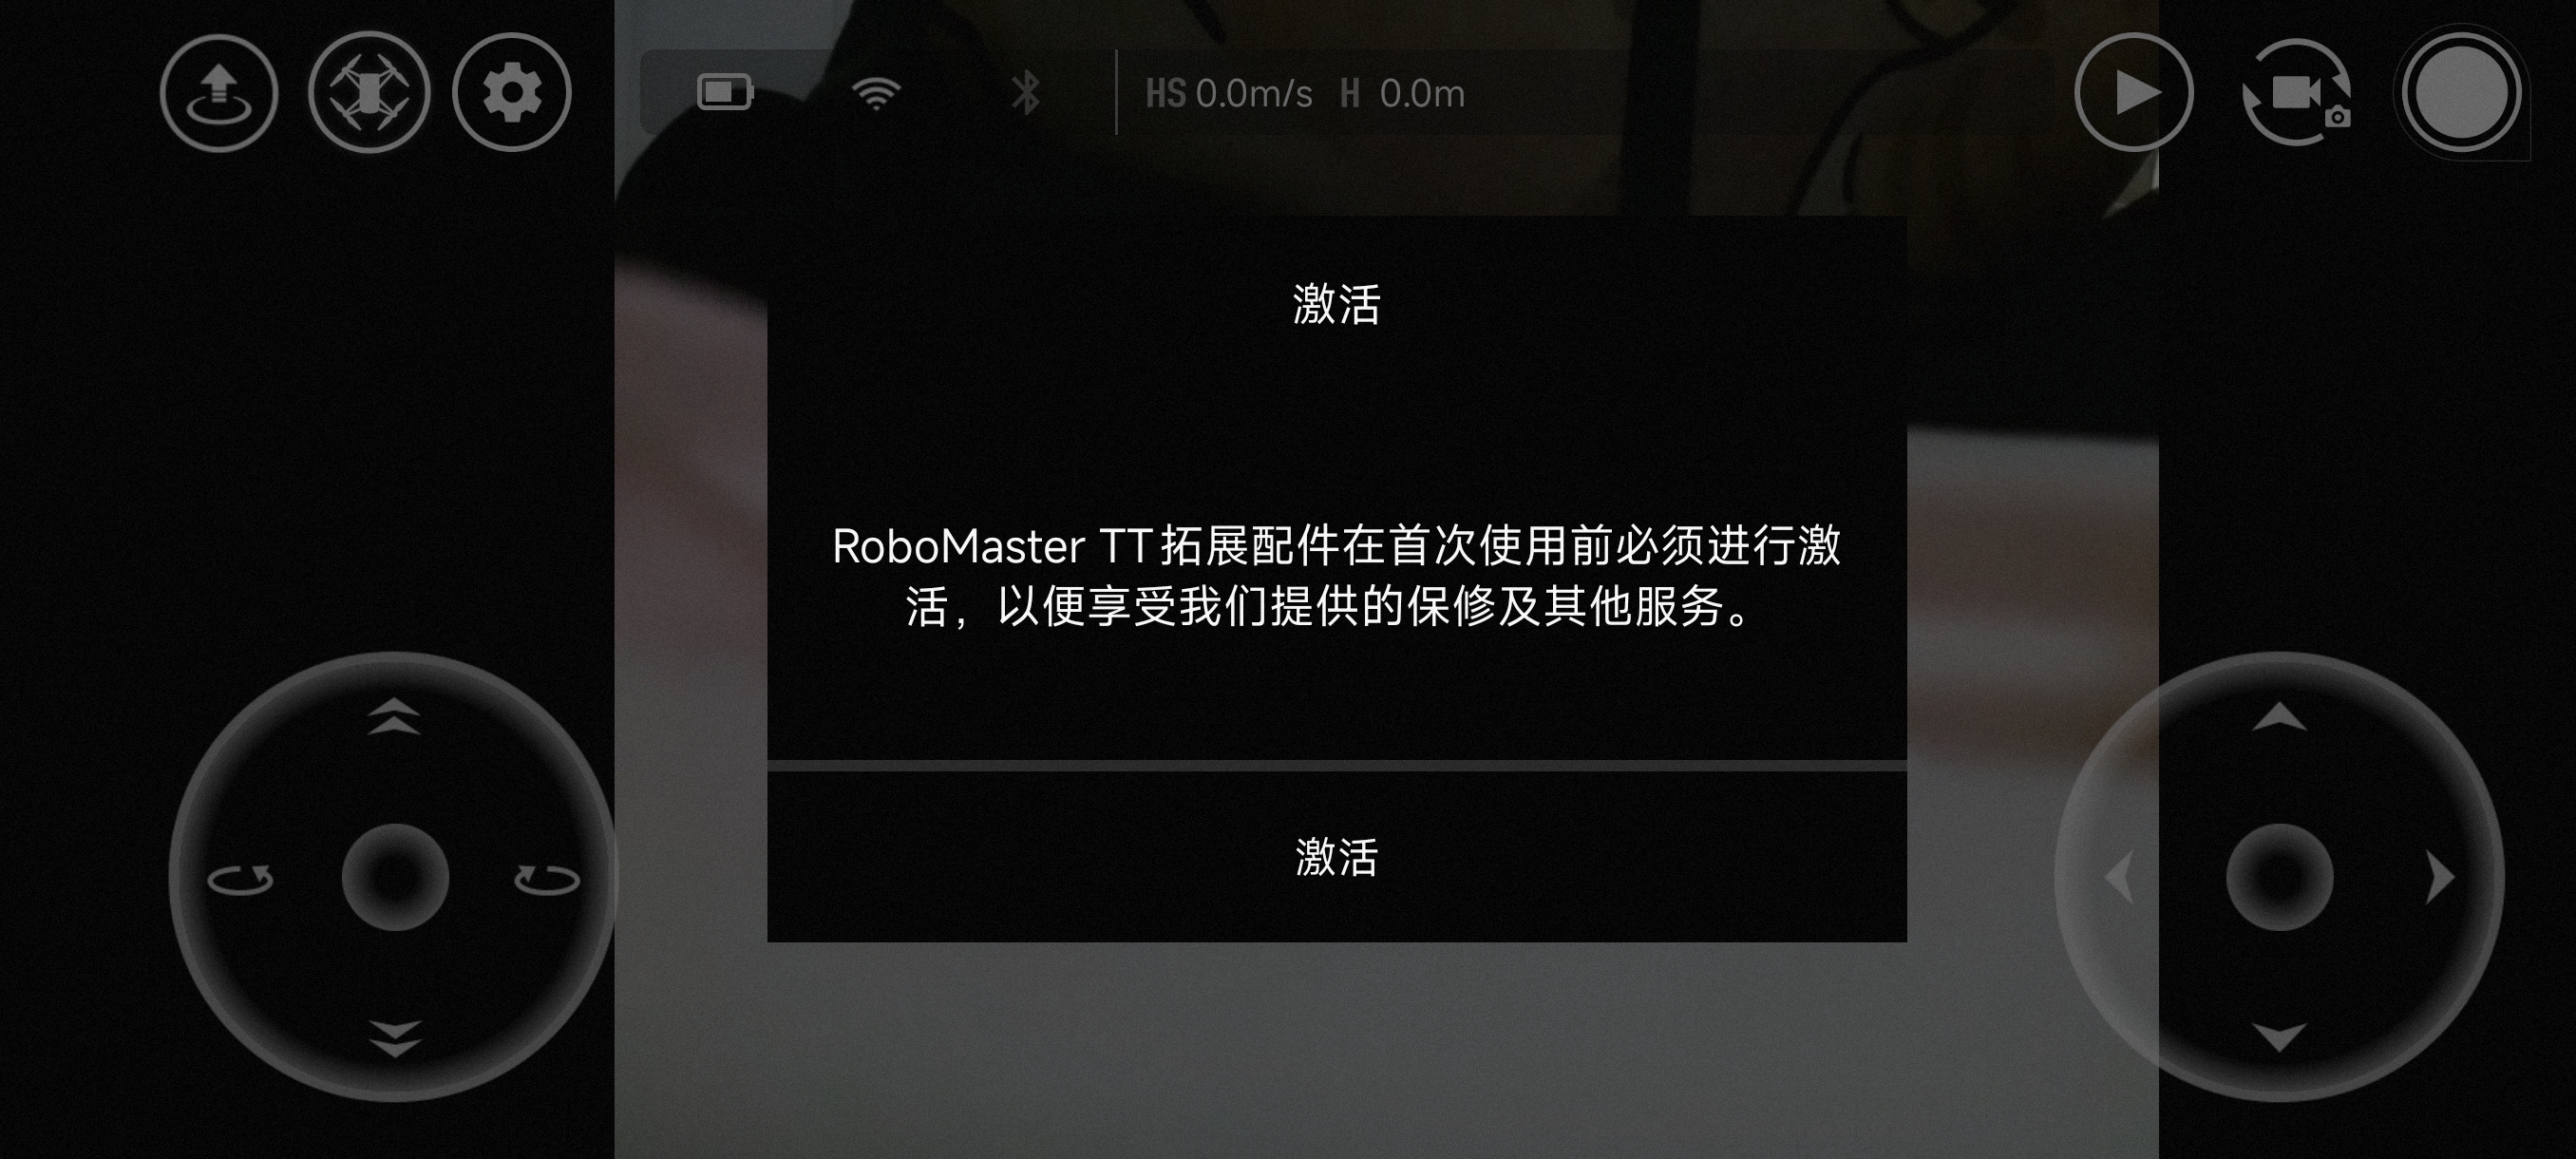
在开始使用之前,请务必先在 ROS2GO 中按照以下步骤进行代码更新:
WARNING
下述所有操作均在 ROS2GO 中进行,请确保 ROS2GO 正常启动
更新代码
roscd rmtt_ros/..
git fetch && git pull -r
如果遇到网络连接超时的问题
fatal: unable to access 'https://github.com/tianbot/rmtt_ros.git/': Failed to connect to mirror.ghproxy.com port 443: Connection timed out可以尝试使用国内加速源,具体方法如下:
提示
下述操作均在tianbot@ros2go:~/tianbot_ws/src/rmtt_ros$终端目录下进行
- 修改本地远端仓库地址
git remote set-url origin https://ghfast.top/https://github.com/tianbot/rmtt_ros.git- 查看远端仓库地址是否修改成功
git remote -v输出如下
origin	https://ghfast.top/https://github.com/tianbot/rmtt_ros.git (fetch)
origin https://ghfast.top/https://github.com/tianbot/rmtt_ros.git (push)- 获取远端的所有修改
tianbot@ros2go:~/tianbot_ws/src/rmtt_ros$ git fetch输出如下
remote: Enumerating objects: 9, done.
remote: Counting objects: 100% (9/9), done.
remote: Compressing objects: 100% (1/1), done.
remote: Total 5 (delta 4), reused 5 (delta 4), pack-reused 0
Unpacking objects: 100% (5/5), 10.03 KiB | 214.00 KiB/s, done.
From https://ghfast.top/https://github.com/tianbot/rmtt_ros
f19c46c..f7169e1 main -> origin/main- 将获取的远端修改合并到本地工作区中
tianbot@ros2go:~/tianbot_ws/src/rmtt_ros$ git pull -r输出如下
Updating f19c46c..f7169e1
Fast-forward
 rmtt_driver/scripts/rmtt_core.so | Bin 641112 -> 641112 bytes
 1 file changed, 0 insertions(+), 0 deletions(-)
Current branch main is up to date.
更新完成后查看当前工作区状态
tianbot@ros2go:~/tianbot_ws/src/rmtt_ros$ git status输出如下
On branch main
Your branch is up to date with 'origin/main'.

nothing to commit, working tree clean
此时更新完成
视频教程
ROS 机器人集群的仿真与实践详解三:ROS 入门无人机
配置网络
使用 RMTT 前,需要配置网络

将这个按钮拨到下面,此时打开电脑 WiFi,搜索以 RMTT-XX 开头的热点信号,将电脑 WiFi 连接至该热点后,即可执行如下命令配置 RMTT 连接到路由器的 WIFI
roscd rmtt_driver/scripts./set_sta.py TianbotOffice www.tianbot.comTianbotOffice是笔者的路由器名字,www.tianbot.com是笔者的路由器密码,仅需改为你的就 OK

此时就已经配网成功,将按钮拨到上面,切换到路由模式,半分钟左右,飞机的扇叶就开始旋转,每当 RMTT 成功连接路由器后都会开启扇叶旋转
查询 RMTT 的 IP 地址
roscd rmtt_driver/scripts
./rmtt_scan_ip.py
启动 RMTT
提示
在执行如下命令之前,请将所有已经打开的终端关闭,否则会引起 IP 错误导致的等待问题
注意
192.168.0.215 就是./rmtt_scan_ip.py查询到的 IP 地址
roslaunch rmtt_driver rmtt_bringup.launch drone_ip:=192.168.0.215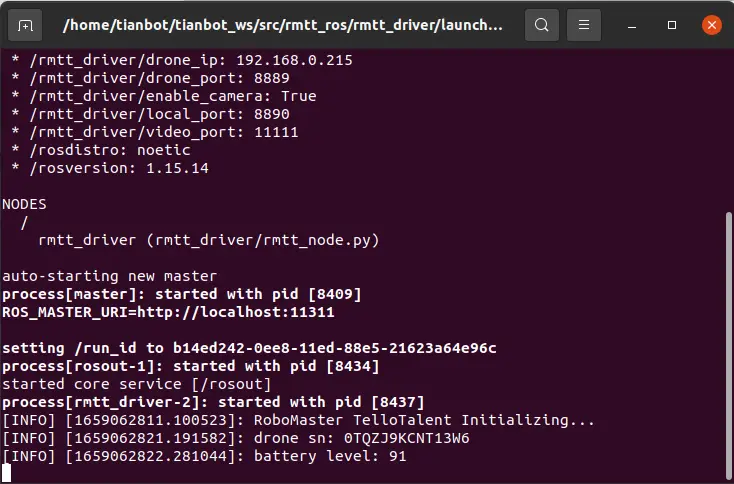
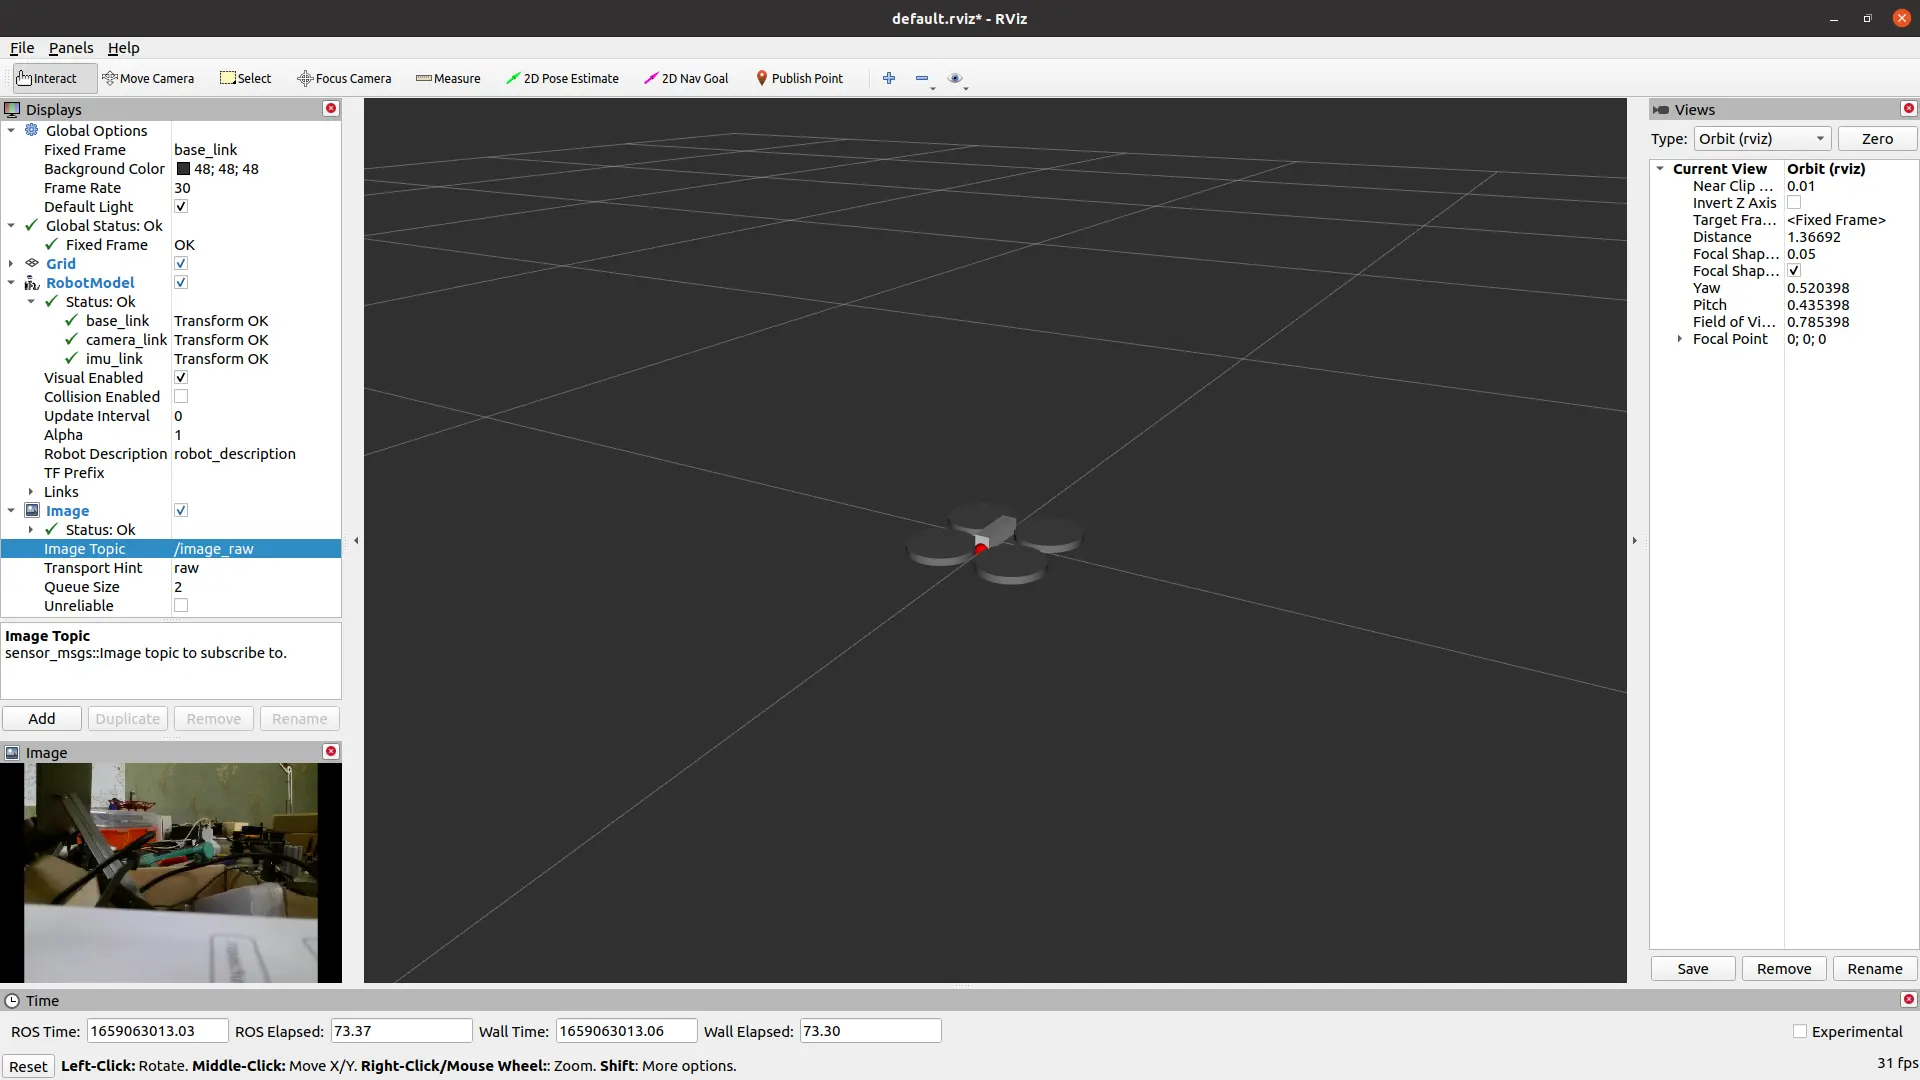
打开一个终端,输入如下命令即可启动 rviz
roslaunch rmtt_description rmtt_description.launch之后按照如图所示添加配置项,即可添加机器人的描述信息
观看 RMTT 发布的话题信息
查看 TOF 传感器数据 (测量距正前方障碍物距离)
rostopic echo /tof_btm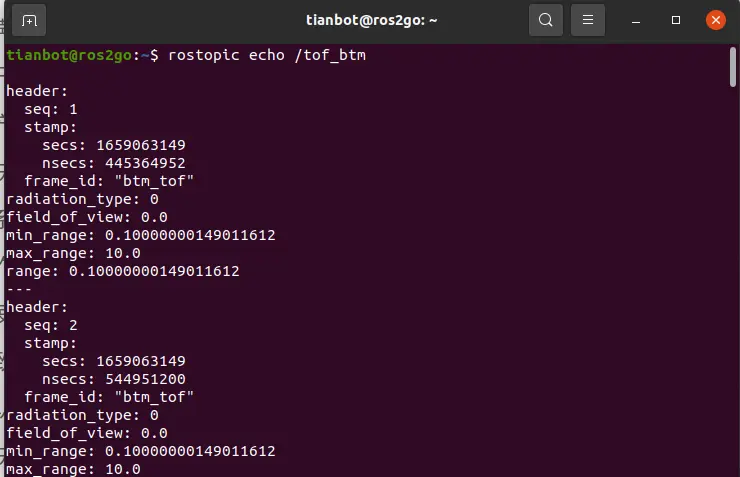
查看海拔高度数据(单位 m)
rostopic echo /altitude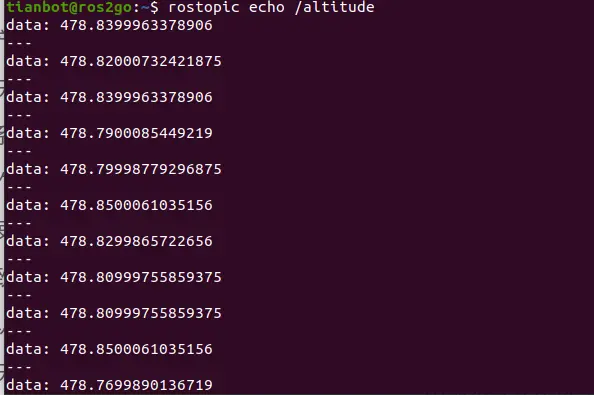
查看图像数据
rostopic echo /image_raw/compressed      # 压缩图像数据
rostopic echo /image_raw                 # 原始图像数据
查看 IMU 数据
rostopic echo /imu_data查看电量数据
rostopic echo /battery在此延伸,使用rostopic list -v,观察更多的话题信息
飞机起飞
rostopic pub /takeoff std_msgs/Empty飞机降落
rostopic pub /land std_msgs/Empty使用 Twist 消息控制飞机移动
rostopic pub -r 10 /cmd_vel geometry_msgs/Twist "linear:
  x: 0.3
  y: 0.0
  z: 0.0
angular:
  x: 0.0
  y: 0.0
  z: 0.0"
然后用 Tab 键补齐,就可以控制 RMTT 的移动
提示
Rmtt 无人机起飞、降落、左转、右转、前进、后退、左移、右移对应的数据内容:
| 指令 | Twist 消息内容 |
|---|---|
| 起飞 | 发布一个空的 Empty 消息到'takeoff'话题 |
| 降落 | 发布一个空的 Empty 消息到'land'话题 |
| 左转 | twist.angular.z = -turn |
| 右转 | twist.angular.z = turn |
| 前进 | twist.linear.x = speed |
| 后退 | twist.linear.x = -speed |
| 左移 | twist.linear.y = speed |
| 右移 | twist.linear.y = -speed |
具体来说,Twist 消息的各个字段含义如下:
twist.linear.x: 线性速度在 x 轴方向上的分量。twist.linear.y: 线性速度在 y 轴方向上的分量。twist.linear.z: 线性速度在 z 轴方向上的分量。twist.angular.x: 角速度在 x 轴方向上的分量。twist.angular.y: 角速度在 y 轴方向上的分量。twist.angular.z: 角速度在 z 轴方向上的分量。
在代码中,speed和turn参数分别控制了前进、后退、左移、右移和左转、右转的速度。
使用 RoboMaster SDK 命令控制
需要修改 rmtt_driver/launch/rmtt_bringup.launch 文件的内容,将 <arg name ="enable_sdk_cmd" 设置为 true
可以通过以下命令打开文件,并修改内容
source tianbot_ws/devel/setup.bash
roscd rmtt_ros/.. && gedit rmtt_driver/launch/rmtt_bringup.launch<?xml version="1.0"?>
<launch>
<arg name ="drone_name" default="$(optenv RMTT_NAMESPACE /)" />
<arg name ="drone_ip" default="$(optenv RMTT_DRONE_IP 192.168.10.1)" />
<arg name ="local_ip" default="$(optenv RMTT_LOCAL_IP)" />
<arg name ="drone_port" default="8889" />
<arg name ="local_port" default="8890" />
<arg name ="video_port" default="11111" />
<arg name ="sdk_logger_level" default="ERROR" />
<arg name ="enable_sdk_cmd" default="true" />
<arg name ="fast_mode" default="true" />
<group ns="$(arg drone_name)">
<node pkg="rmtt_driver" name="rmtt_driver" type="rmtt_node.py" output="screen">
<param name="drone_ip" type="string" value="$(arg drone_ip)" />
<param unless="$(eval local_ip=='')" name="local_ip" type="string" value="$(arg local_ip)" />
<param name="drone_port" type="string" value="$(arg drone_port)" />
<param name="local_port" type="string" value="$(arg local_port)" />
<param name="video_port" type="string" value="$(arg video_port)" />
<param name="enable_camera" type="bool" value="true" />
<param name="sdk_logger_level" type="string" value="$(arg sdk_logger_level)" />
<param name="enable_sdk_cmd" type="bool" value="$(arg enable_sdk_cmd)" />
<param name="fast_mode" type="bool" value="$(arg fast_mode)" />
</node>
</group>
</launch>修改完成后,重新启动 roslaunch rmtt_driver rmtt_bringup.launch drone_ip:=xxx.xxx.xxx.xxx 文件即可
SDK 控制实例
提示
这样启动后会有一个 topic 叫 sdk_cmd,类型是 string,就可以按照 TT 的明文 sdk 发控制命令
下面的这个demo示例完成了一个简单的动作流程,实现效果
- 飞机起飞,
- 向前飞50cm,
- 再向右飞25cm,
- 然后降落
tello_control_with_sdk.py
import rospy
from std_msgs.msg import String

command_list = []  # 全局变量,存储待执行的命令
is_finished = False  # 标志位,表示命令是否执行完毕

def tello_command():
    """
    顺序执行 tello 命令
    """
    pub = rospy.Publisher('sdk_cmd', String, queue_size=10)   # 确保  <arg name ="enable_sdk_cmd" default="true" /> 在 rmtt_bingup.launch 中已设置
    rate = rospy.Rate(0.1)        # 设置期望发布频率为 0.1 Hz
    global command_list, is_finished

    while not rospy.is_shutdown() and (command_list or not is_finished):
        if command_list:
            command = command_list.pop(0)  # 取出列表第一个命令并删除
            pub.publish(command)
            rate.sleep()                   # 自动计算达到目标频率所需的剩余时间
        else:
            is_finished = True  # 设置标志位,表示命令执行完毕

if __name__ == '__main__':
    rospy.init_node('tello_commander', anonymous=True)

    # tello 明文 SDK 控制命令:https://dl-cdn.ryzerobotics.com/downloads/tello/0301/Tello+SDK+%E4%BD%BF%E7%94%A8%E8%AF%B4%E6%98%8E.pdf
    # 初始化命令列表,可以根据需要修改
    command_list = ['command', 'takeoff', 'forward 50', 'left 25', 'land']

    tello_command()
使用 Map 坐标系
如果需要使用 Map 坐标系,则要将 RMTT 放置到地图中
我们使用的是普通地图,非夜光地图
rosservice list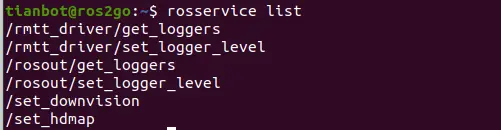
普通地图为/set_downvision,夜光地图为/set_hdmap
调用下视摄像头服务
rosservice call /set_downvision "data: True"提示
注意下视摄像头和前视摄像头不能同时启用,只能启用一个
调用视觉地图相对定位服务
rosservice call /set_hdmap "data: True"data 是布尔型,将默认的 False 改为 True
此时 Rviz 中的 image 的图像就变为下置摄像头,且基坐标系 Fixed Frame 多了 map
必须启用 rosservice 的地图,且起飞才能更改坐标系 map
起飞 RMTT,将基坐标系改为 map,
rostopic pub /takeoff std_msgs/Empty
不同情况下的 TF 树
调用下视摄像头服务前
打开 rqt 观察 TF 树
当没有使用下述 rosservice 时 TF 树为
rosservice call /set_downvision "data: True"
调用视觉地图相对定位服务后
而调用视觉地图相对定位服务后,会发现增加了一个从 base_link 到 map 的 TF 变换
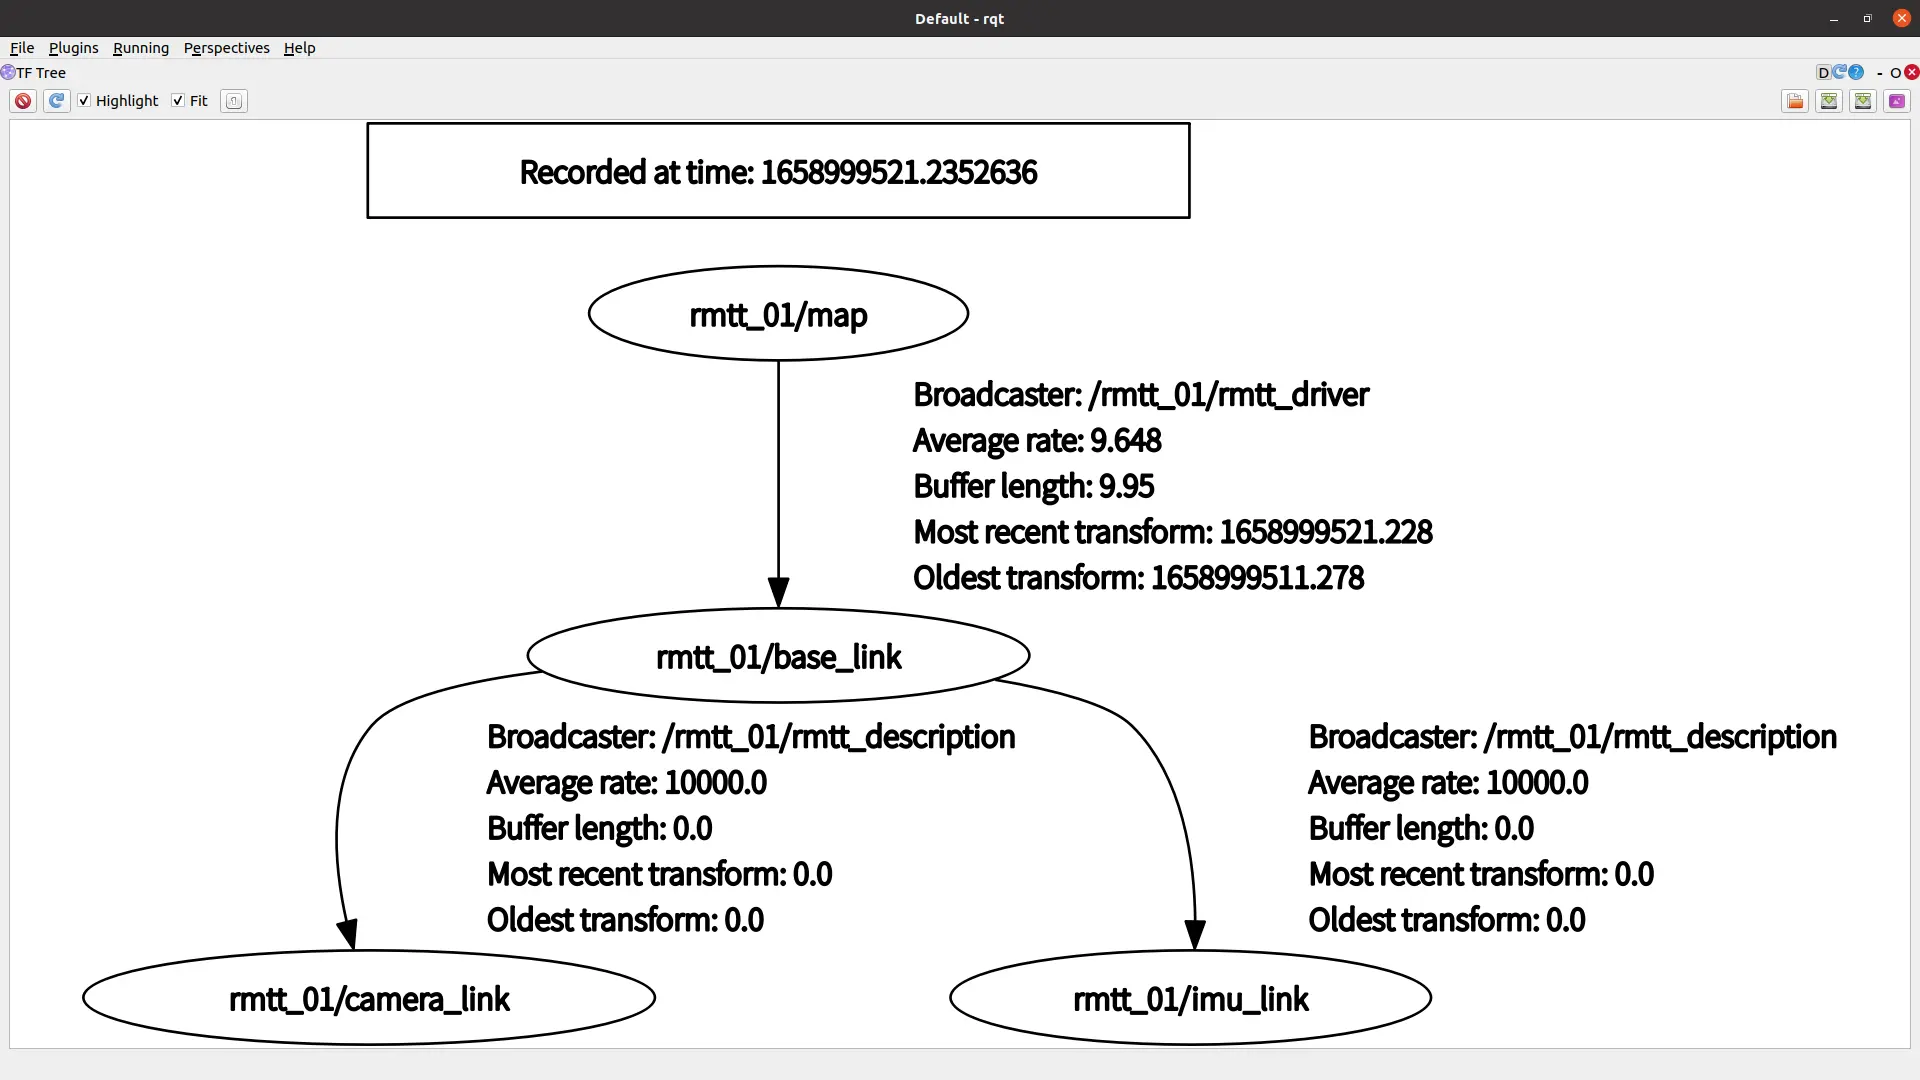
添加 world 到 map 静态变换
同时我们可以发布一个静态变换,将 map 坐标系关联到 world 坐标系
rosrun tf static_transform_publisher 0 0 0 0 0 0 world /map 20此时的 TF 树为
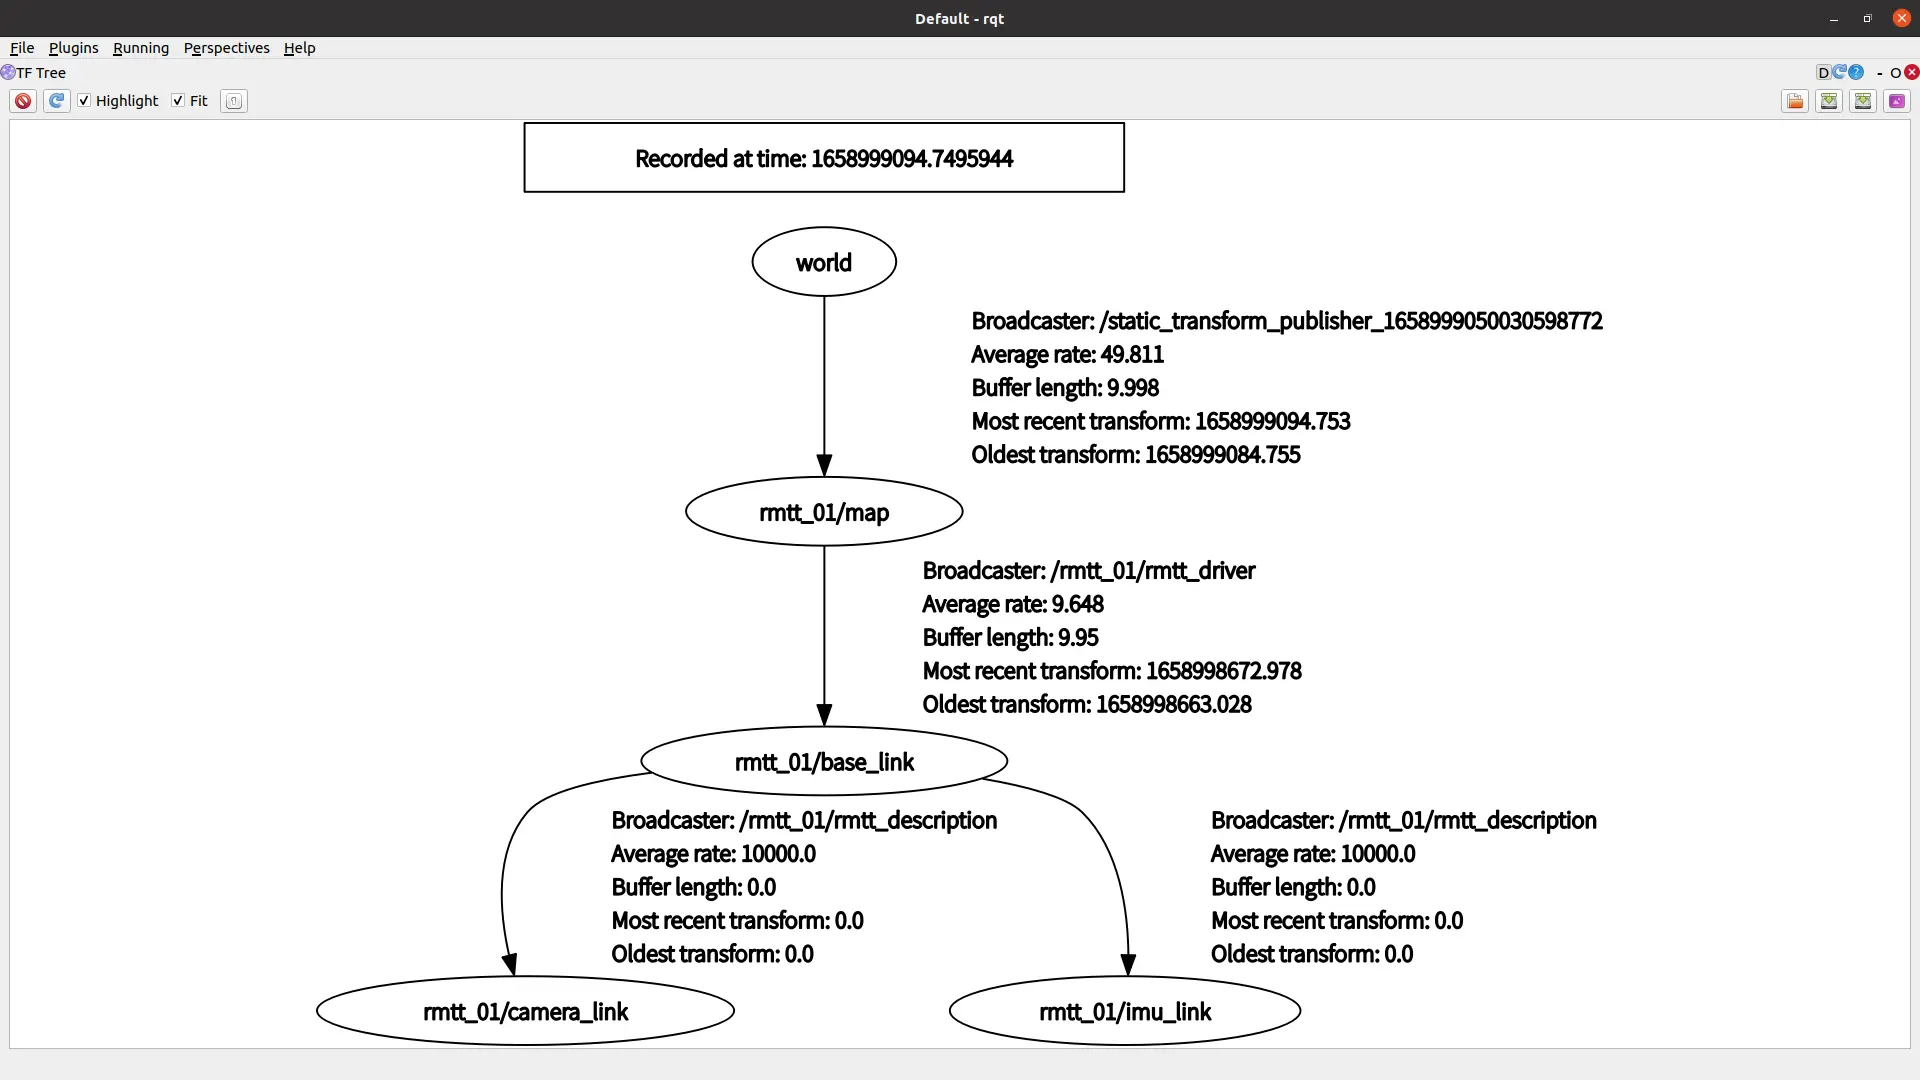
三个 TF 树反应了不同坐标系下的 TF 关系,值得深思!
注意
注意:如果涉及到多台机器人时,需要注意命名空间的问题
如果您观看了空地协同两台 RMTT 与两台 TBMini 的话,可能会使用下面方式来启动机器人,
roslaunch rmtt_driver rmtt_bringup.launch drone_ip:=192.168.0.215 \
drone_name:=rmtt_01 local_port:=8889 video_port:=11111roslaunch rmtt_description rmtt_description.launch drone_name:=rmtt_01此时您使用时rostopic list 或rossevice list 观察的话,会发现话题名称前都有一个/rmtt_01 此时的命令就为
rostopic echo /rmtt_01/tof_btmrostopic pub /rmtt_01/takeoff std_msgs/Empty